Original Baroque Violin - Made by Poirson?
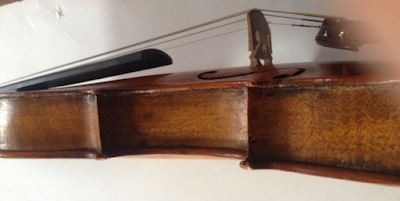
What I never first realised as I initially set about fixing it is that this instrument is probably a genuine baroque violin (probably 18th century); the fingerboard being a fair bit shorter and the back being noticeably flatter and other proportions different to a Strad model.
The purfling on the violin is simply drawn on and would have been done using a goose quill and ink.
At some point in time - a long time ago by the looks of it - an expert luthier added a small wedge under the fingerboard, which was likely done in the C19th to elevate the fingerboards of older baroque violins to be closer to the steeper angle of a Stradivari model. But the neck is genuine and there is no graft. The steeper angle increases the tension of the strings across the bridge and so make the instrument louder. Usually when this was done a longer Stradivarius fingerboard was added. But not in the case of this particular violin.
 |
| Poirson violin before repair and restoration |
 |
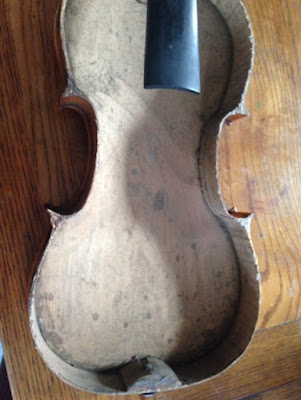
| Fully blocked but no lining - apart from the bottom waistline. |
 |
| Under years of dust I found an old pencil (luthier/repairer's?) signature dated December 10th 1836 |
The violin appears to have a Poirson brand name on the back, but the lettering is rather worn. If it is a Poirson violin, then taking account of the old pencil writing inside of 1836 - and working on the premise that the pencil writing is repairer's signature - then it could be a Pierre Poirson (1732-1742) violin. It can't be an Elophie Poirson violin, because that maker only made violins between 1876 and 1918.
This appears to me to be a genuine baroque (or late 18th early 19th transitional?) violin and if I am right (which is far from certain) that points me initially towards Pierre Poirson who made violins between 1732 and 1742 in Mirecourt, France. But that is just an initial start. I could be completely wrong.
 |
| Baroque bridge cut and fitted |
After using hot hide glue and traditional parchment cleats to glue and secure an open seam near the base of the table of the violin, I made new violin grade matched grain spruce repair caps to three of the points above the bouts (the originals having been broken in the past) I hot hide glued and clamped these in place and then glued the table back on the violin using hot hide glue.
I tried the repaired violin with Dominant strings and a modern tailpiece and a normal bridge (Aubert) but it was very unresponsive on the D string. I had to really tune the bridge to get anything like a good tone. So I tried a baroque bridge, Dominant strings and longer vintage late baroque length tailpiece. It sounds fantastic - I tuned it first to what most people agree is most likely the classic Baroque 415 Hz and then tried it at the modern standard 440 Hz. Both sound great but I have tuned it now to 440Hz.
 |
| Longer baroque antique tailpiece and an antique transitional chin (jaw) rest |
I added an interesting minimal antique chinrest (baroque violin players don't tend to use a chinrest) that works very well. I place a handkerchief over it to protect the instrument's varnish from my chin when playing.
 |
| Baroque violins tend to have a markedly flatter back, as does this one |
The violin is sweet, colourful mellow and has good volume and brightness on the A string. Beautiful mellow soulfulness and pleasingly controlled resonance on the D string. I set the bridge at 4mm on the E-string to 5mm on the G string.
Now I will have it played and assessed by a professional violinist.
Then it will need to be re-homed.
Other Pictures
 |
| Inked purfling |


Comments
Post a Comment